Main content
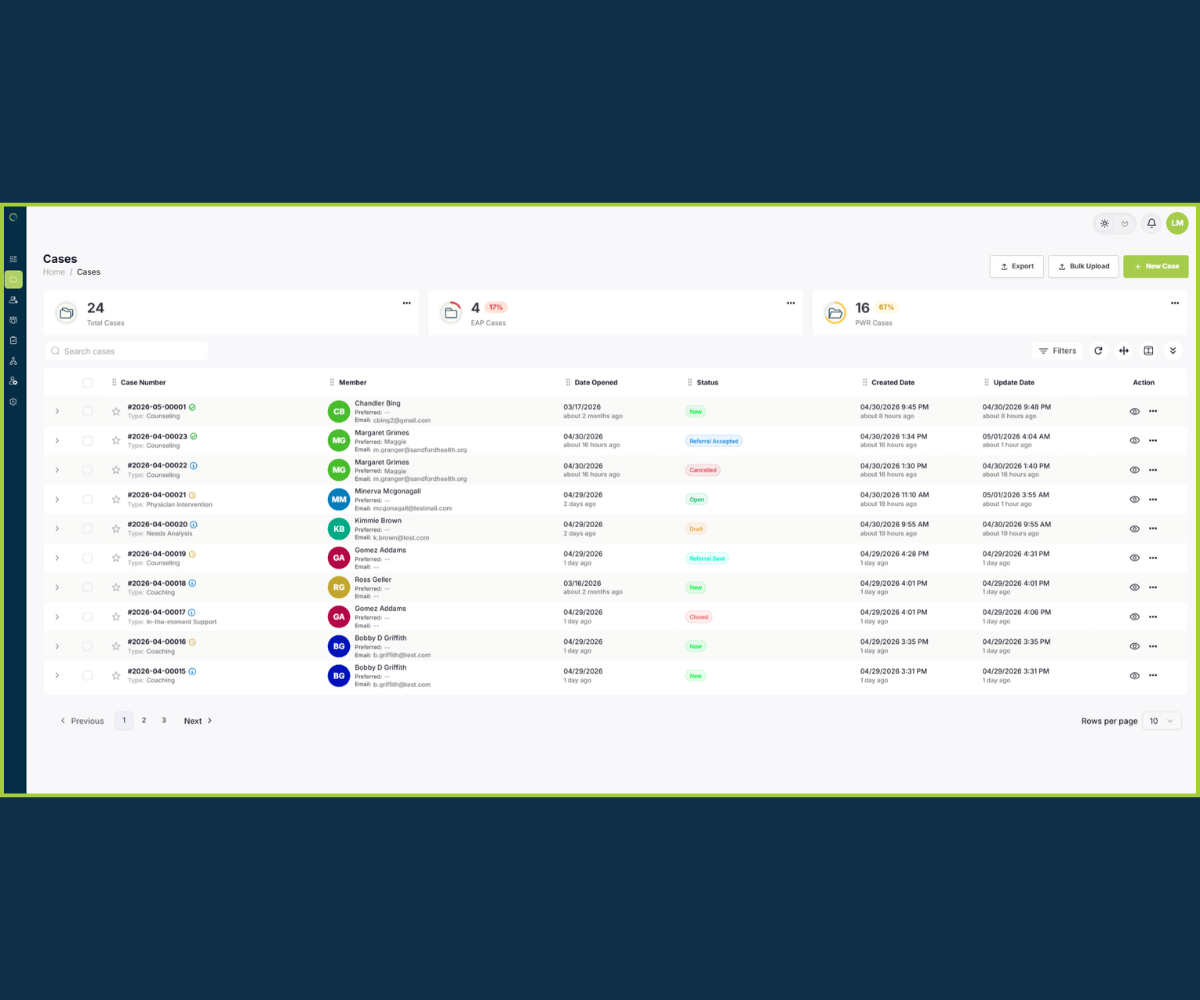
Cases List
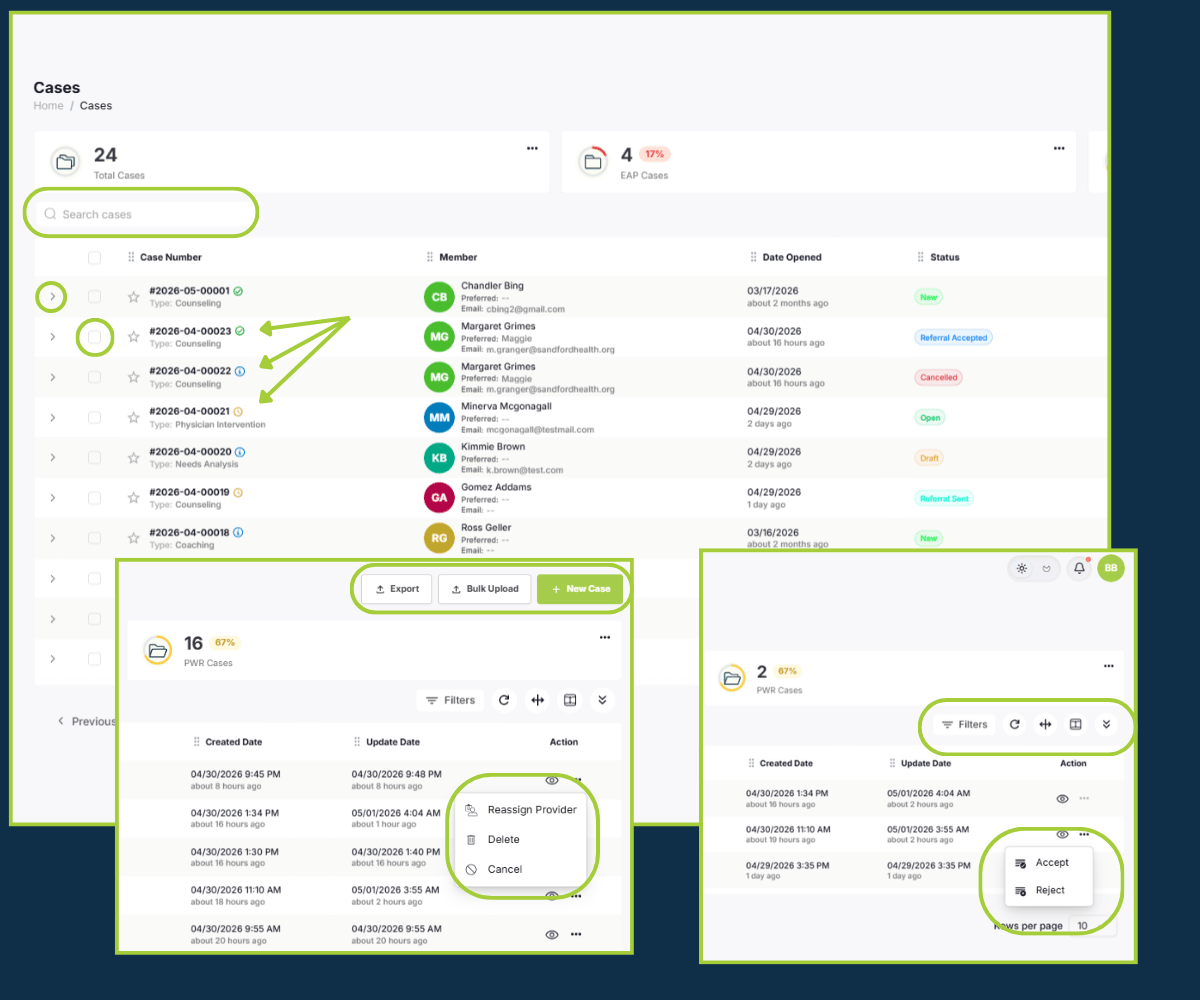
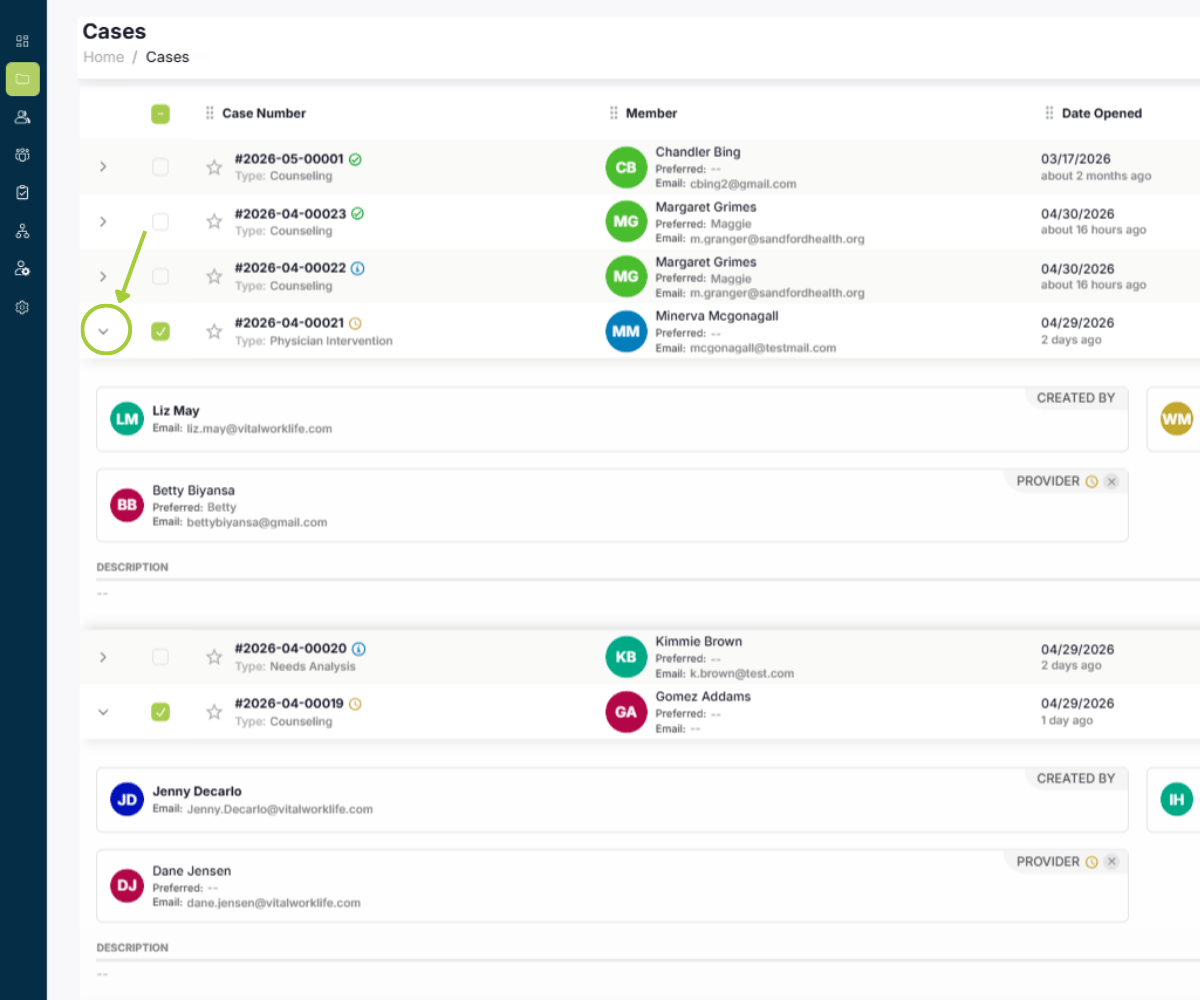
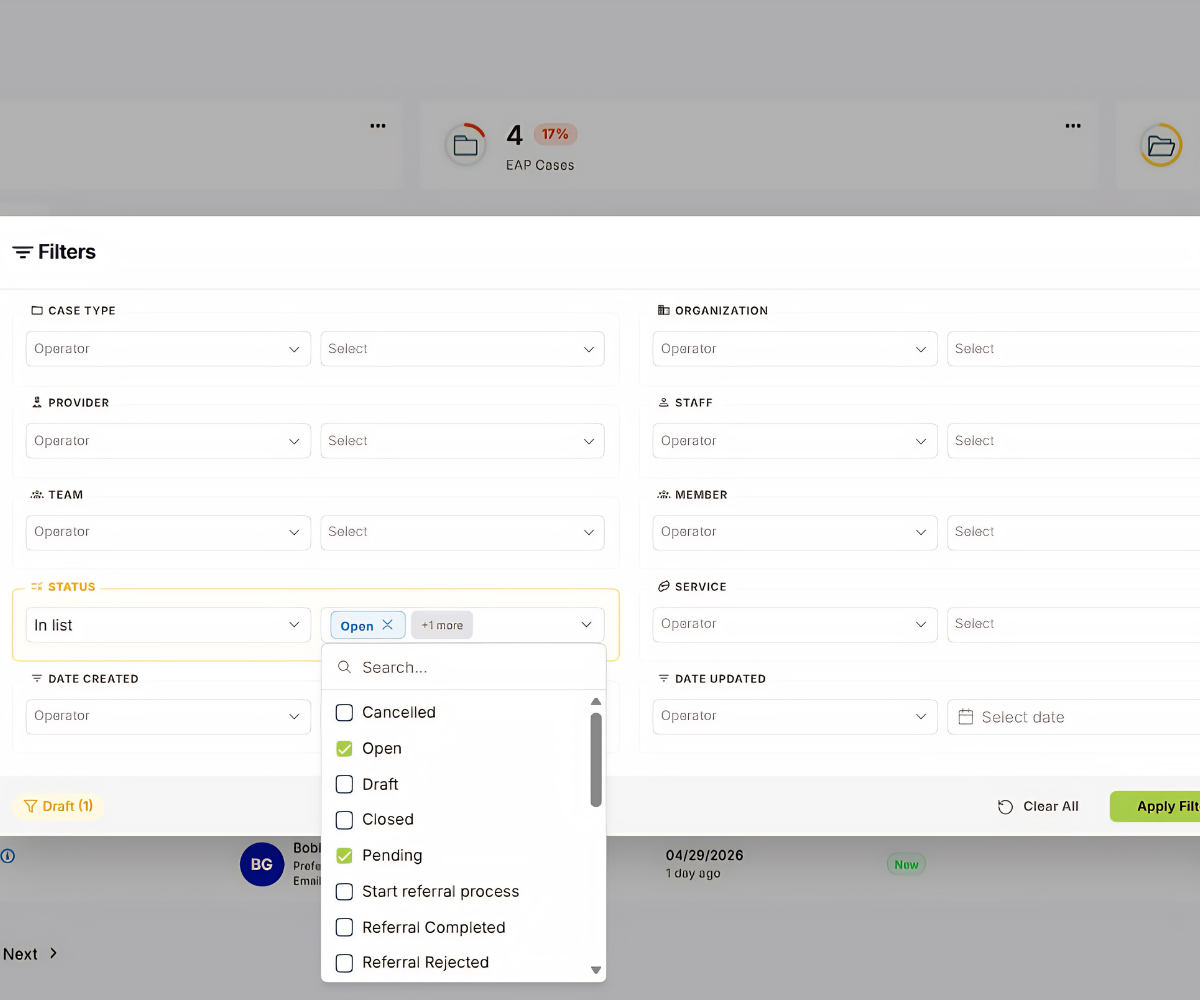
Looking into the Case
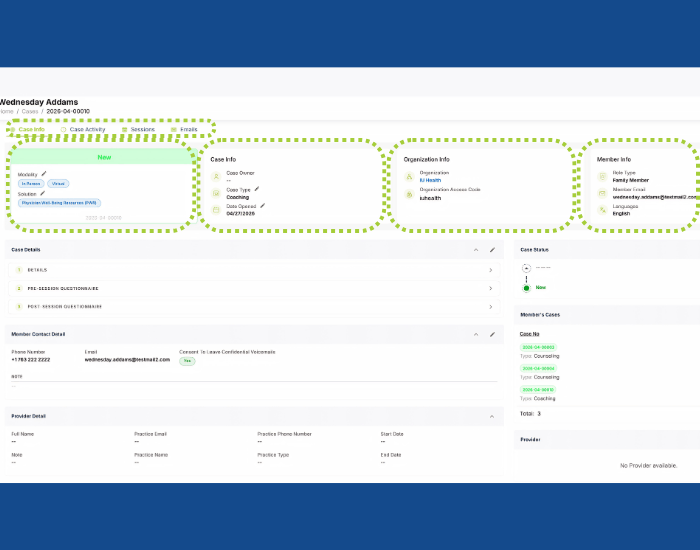
Click a case number or the view icon to open the Case Detail page. The page has four tabs across the top: Case Info, Case Activity, Sessions, and Emails. The Case Info tab is the default view.
A Reject Case button appears in the top-right corner.
The summary header spans all four tabs and displays four information panels:
Status card (left) — shows the current case status badge (New, Draft, Referral Coordination, etc.), Modality tags (In Person, Virtual), Solution tag (e.g., Employee Assistance Program, Physician Well-Being Resources), and the case number. Modality, Solution, and Date Opened are editable via pencil icons.
Case Info — Case Owner, Case Type, and Date Opened.
Organization Info — Organization name (linked to the org record) and Organization Access Code.
Member Info — Role Type, Member Contact Info: Email &/ Phone, and Languages.
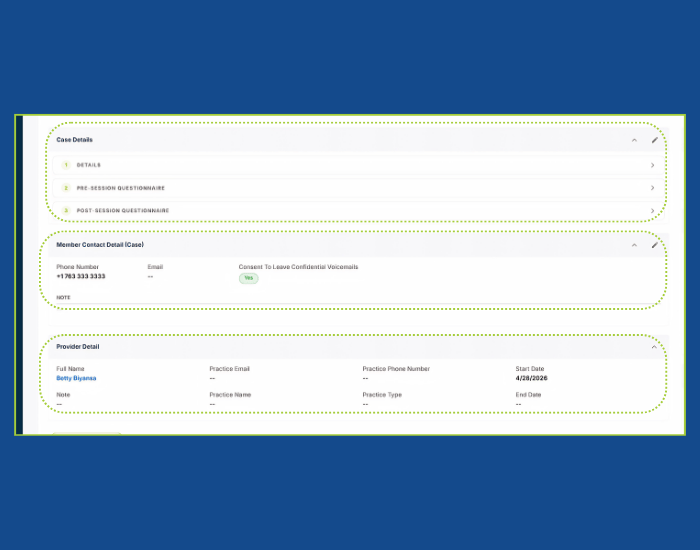
Key information is organized into collapsible case cards.
Below the summary header, the Case Info tab displays the following sections:
Case Details — a collapsible section (editable via pencil icon) containing numbered accordions that differ depending on the type of solution case type. Click any accordion to expand and view or edit its contents.
Member Contact Detail — a collapsible, editable section showing the member's Phone Number, Email, Consent To Leave Confidential Voicemails (Yes/No badge), and a Note field. This section defaults to the member's contact information from their member record. When a member requests different contact information for a specific case, that case-level contact detail is captured here and the title updates to Member Contact Detail (case) to indicate the information shown is specific to this case, not the member's general record.
Provider Detail — a collapsible section showing the assigned provider’s Full Name (linked to their provider record), Practice Email, Practice Phone Number, Start Date, Note, Practice Name, Practice Type, and End Date.
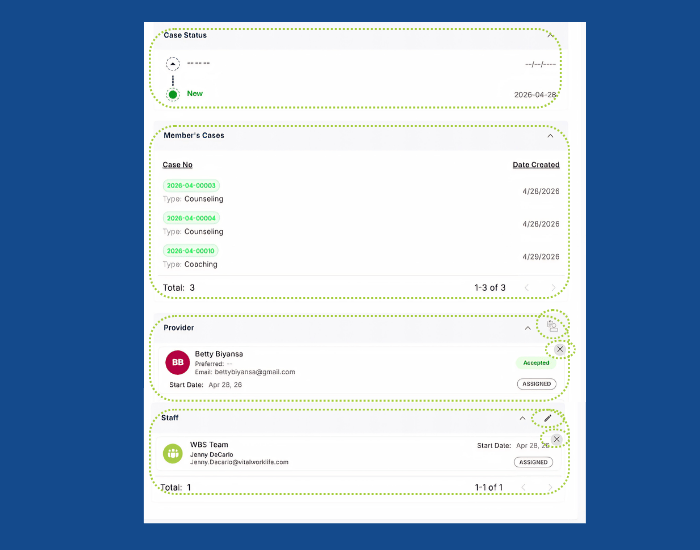
On the right, displays four key cards.
Case Status — a visual timeline showing the case’s status progression with dates.
Member’s Cases — a list of all cases for this member, showing Case Number (linked), Type, and Date Created. Useful for quickly reviewing case history and checking for duplicate or related referrals.
Provider — lists assigned providers with their avatar, name, email, start date, acceptance status badge (Accepted, Assignment Revoked, etc.), and role label (ASSIGNED). Use the add icon to assign or reassign a provider. If there is a provider assigned, you can unassign by selecting the x icon.
Staff — shows the internal team member(s) assigned to the case (team name, staff member name, start date). Editable via pencil icon.
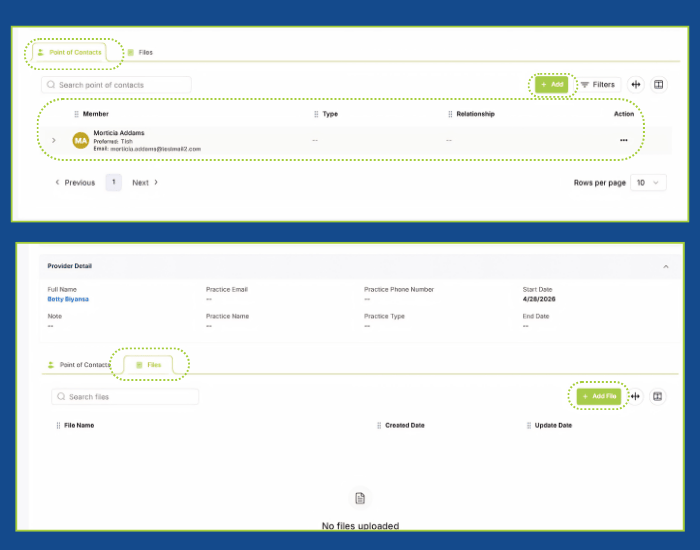
At the bottom of the Case Info tab, two sub-tabs provide additional resources:
Point of Contacts — lists contacts associated with the case, showing Member name (avatar, preferred name, email), Type, Relationship, and Action. Use the + Add button and Filters to manage the contact list.
Files — a file repository for the case showing File Name, Created Date, and Update Date. Use the + Add File button to upload documents.
Case Activity Tab
VITALsync Case Activity | Activities Sub-tab
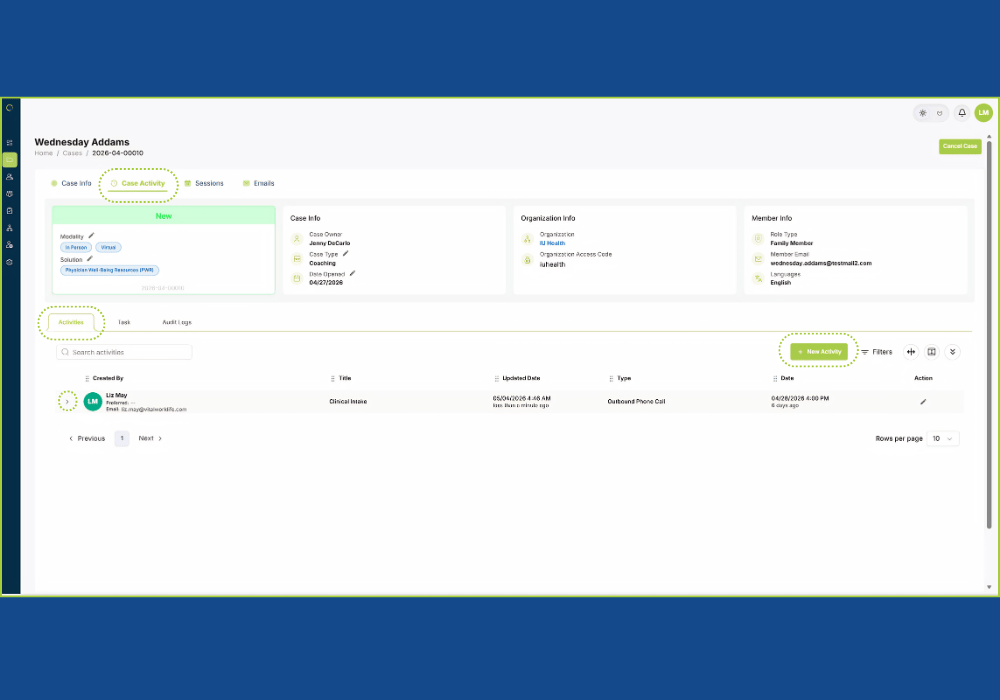
Click the Case Activity tab to access activity notes, tasks, and audit history. This tab contains three sub-tabs: Activities, Task, and Audit Logs.
Activities — the default sub-tab, showing all case activity notes in a table with columns for Created By, Title, Updated Date, Date, and Action. Use the search bar and Filters for quick lookups.
Click + New Activity to open the New Activity form.
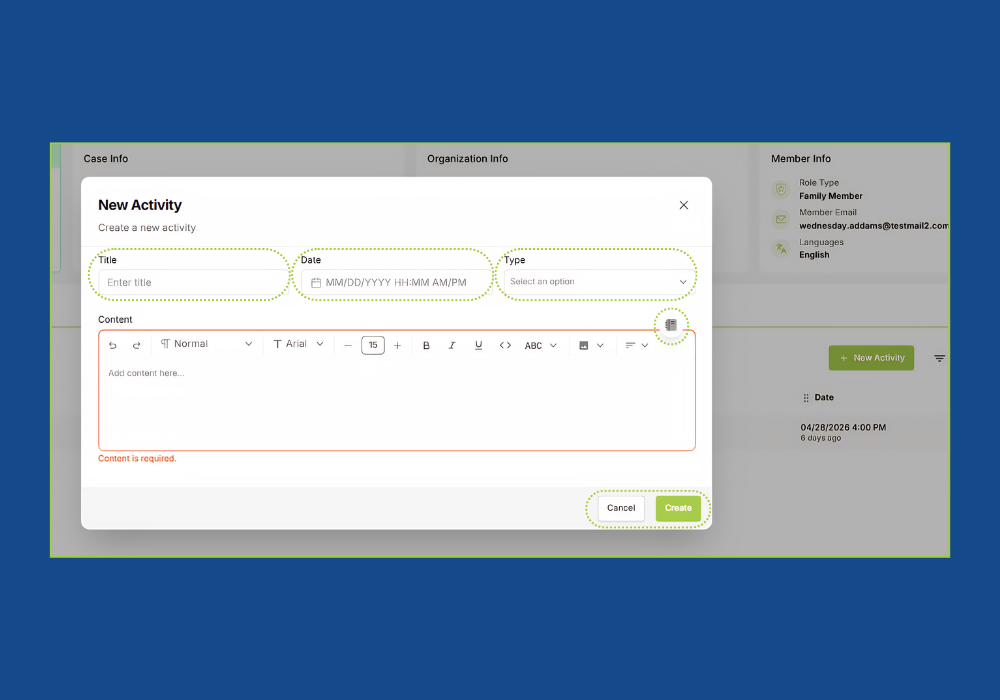
VITALsync Case Activity | New Activity Note
The New Activity form includes: Title, Date, Type dropdown, and Content. Content is a required field.
The Type dropdown includes: Case update, Client Feedback, File Update, FYI, Inbound Email, Inbound Phone Call, and additional options. Select the type that best describes the activity being documented.
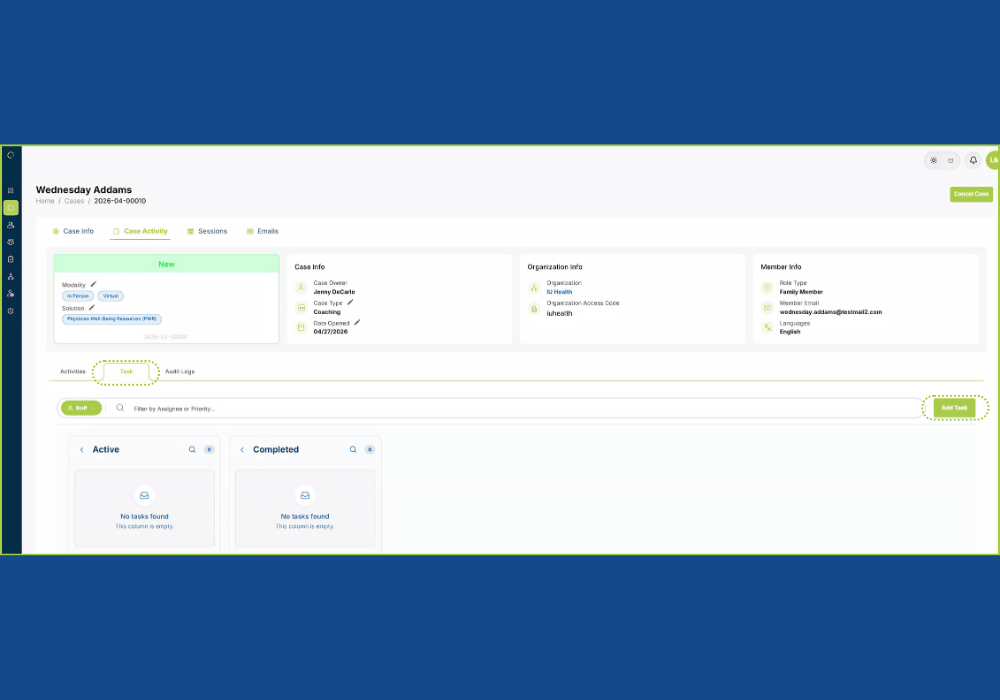
VITALsync Case Activity | Tasks Sub-tab
The Tasks sub-tab displays case-related tasks in a kanban-style layout with two columns: Active and Completed.
Each column shows a count badge. A Staff toggle at the top filters tasks by assignment, and the search bar supports filtering by assignee or priority.
Click Add Task to create a new task.
* Audit Logs — a planned feature that will display a change history for the case record. Currently shows “We’re working hard to bring this feature to you soon.”
.png?width=700&height=550&name=Case%20session%20role%20view%20(1).png)
Sessions Notes
Click the Sessions tab to manage session records and billing for the case. The tab displays the Sessions & Payments sub-tab as the default view.
At the top, the session count tracker displays Total Session (authorized count) and Remaining Session (sessions still available). This tracker updates automatically as sessions are created.
The button options available at the top of the Sessions tab depend on your role type:
Providers see a + New button to create a session record and enter session notes (Progress Note, Modality, Disposition, etc.). Providers also see a Request Sessions button once all authorized sessions have been completed (Remaining Sessions reaches zero). Provider session requests are routed to the Clinical Team for approval.
Internal staff (WBS, Clinical Team, Care Navigation) see both the + New button and the Request Sessions button at all times. Use Request Sessions to adjust the session count for a case — such as adding sessions for a provider reassignment, formal referral, or chemical assessment allocation. At go-live, all session requests (including internal) require approval; auto-approval for staff submissions is planned as a near-term enhancement.
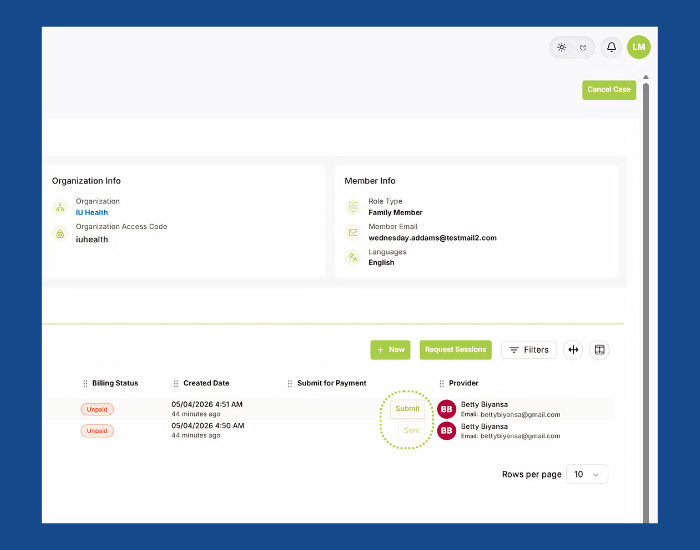
The session list table includes columns for Session ID, Member, Session Date (with time range), Next Appointment Date, Billing Status (Unpaid, Paid), Created Date, Submit for Payment (Submit or Sent), Provider, and Action (edit, delete). Use Filters and the toolbar for sorting and display options.
Creating a Session Note
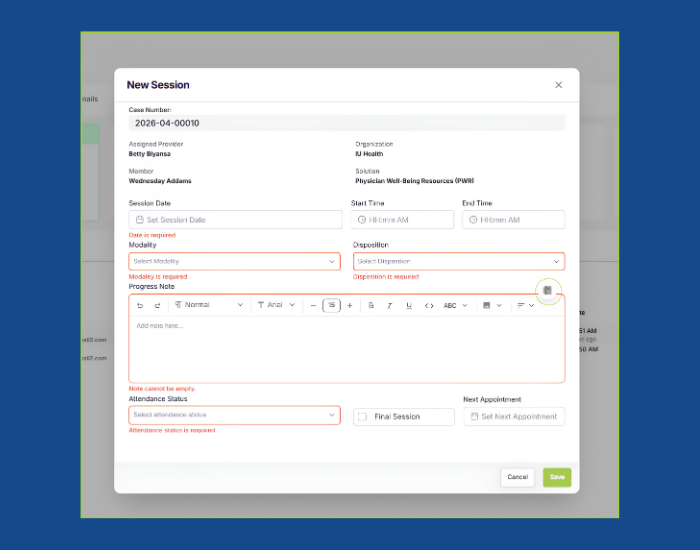
Click + New to open the New Session form. The form auto-populates the Case Number, Assigned Provider, Organization, Member, and Solution from the case record. Required fields (highlighted) include:
Session Date, Modality (dropdown), Disposition (dropdown), Progress Note (rich text editor), and Attendance Status (dropdown).
Additional fields include: Start and End Times, Final Session checkbox and Next Appointment date picker. Click Save to create the session record or Cancel to discard.
Use the binder icon in the Progress Note field to insert a pre-built template for structured session documentation. Templates are optional and may vary by case type.
|
Important: The Final Session checkbox indicates this is the last session for the case. Checking it triggers service-specific closing workflows in VITALsync. The final session may occur before all authorized sessions are used. Not required, but should always be checked when applicable. |
.png?width=700&height=550&name=Case%20session%20expanded%20(1).png)
From your sessions list, you can expand for easy view details.
Click the expand arrow on any session row to view its full details.
The expanded view displays: Modality, Disposition, Billing Started, Attendance Status, Final Session (Yes/No), Updated At, and the full Progress Note content.
If a session is sent for payment, a Bills section below the session details shows associated billing records, including: Bill ID, Draft/Sent status, Provider, Number, Ref ID, Subtotal, Tax, Total, Paid, Balance, Created Date, and Paid Date.
Once you've completed your session notes and saved, send to billing for payment.
The Submit for Payment column in the session list tracks billing submission status.
Click Submit to send the session for payment processing. You will see a pop up confirmation box to Confirm you want to submit the session for billing.
Once submitted, the status changes to Sent.
The Billing Status column will provide the payment status of the sent session.
Case Email
VITALsync Case Emails | Emails tied to the specific case
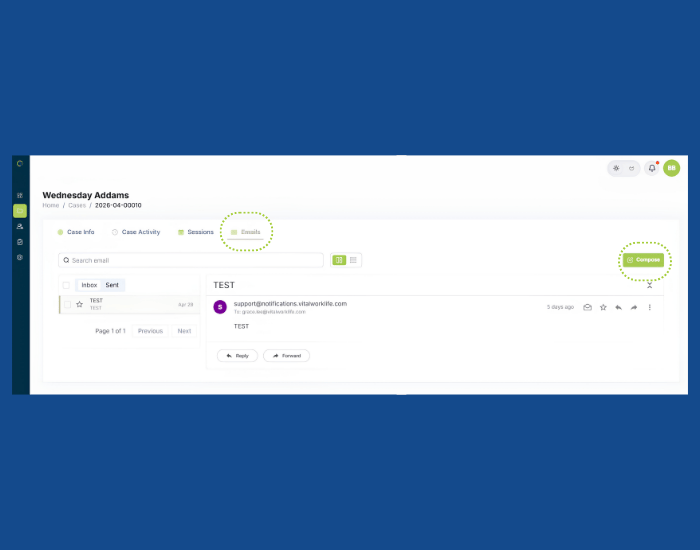
Click the Emails tab to manage case-related email communication.
The tab provides a search bar, view toggle icons, and Inbox and Sent views for tracking messages.
VITALsync Case Emails | Drafting an email
The New Activity form includes: Title, Date, Type dropdown, and Content. Content is a required field.
Click the Compose button to open the New Message form. The form includes: To (type email and press Enter or semicolon to add), CC and BCC fields, Subject line, Message body, and a file attachment area. A template icon in the editor toolbar provides access to pre-built email templates.
Click Send to deliver the message or Cancel to discard.
All messages sent through this tab are automatically documented against the case record.
Step 1 Member Information
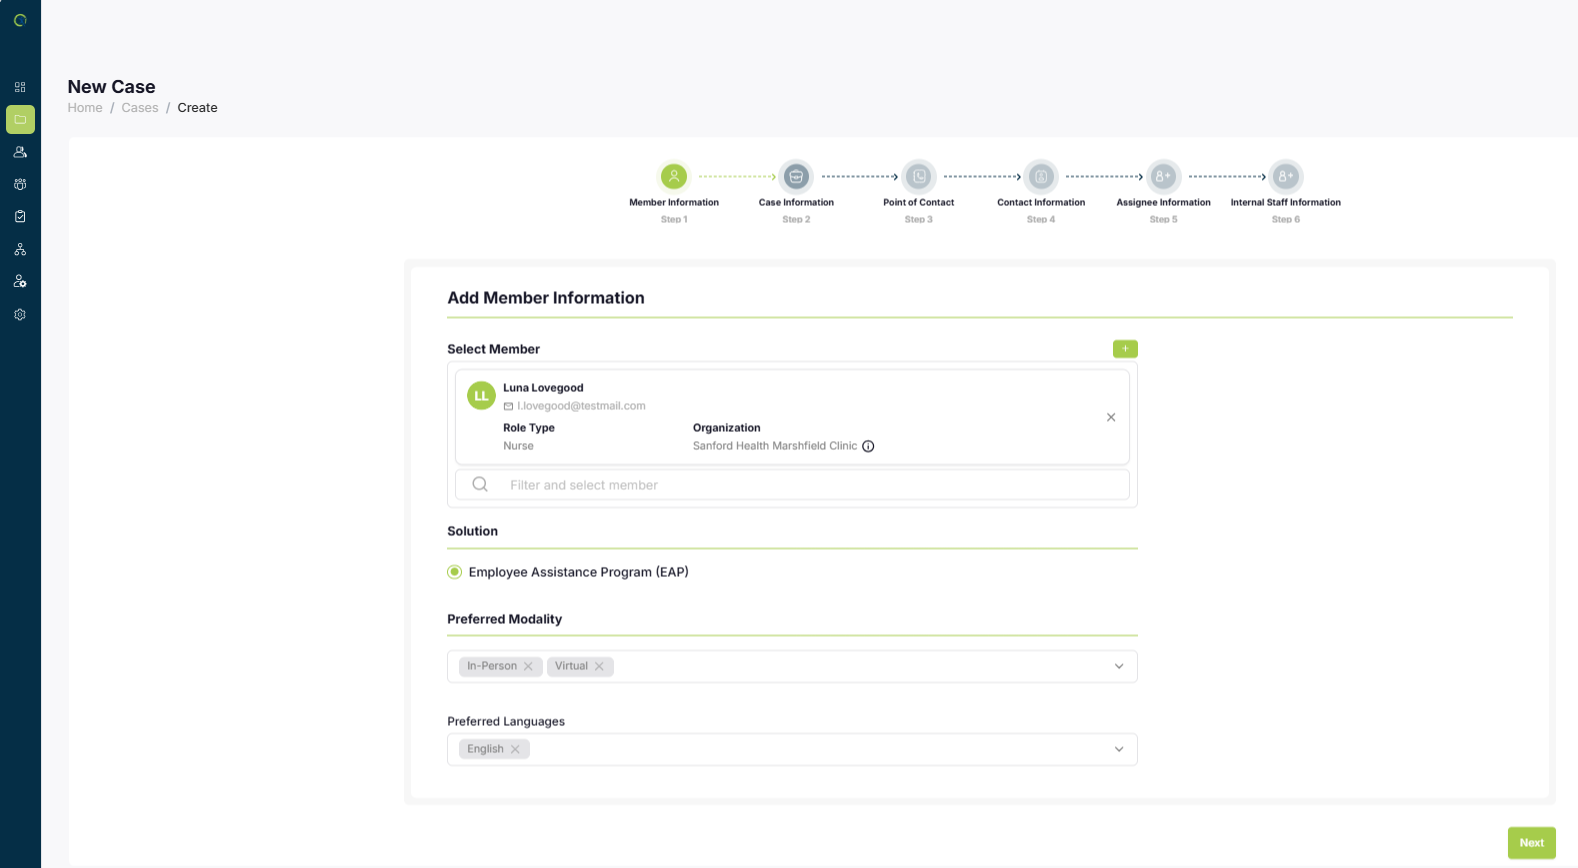
When creating a case from the Cases module, you must search for and select the member this case is for. Use the search bar to find the member by name or email, then select them. Once a member is selected, their Solution, Preferred Modality, and Preferred Languages will populate automatically based on their profile. You may edit any of these fields.
Click Next when you are ready for Step 2.
If you need to create a new member, just click the green + button at the right, top corner of the Select Member field.
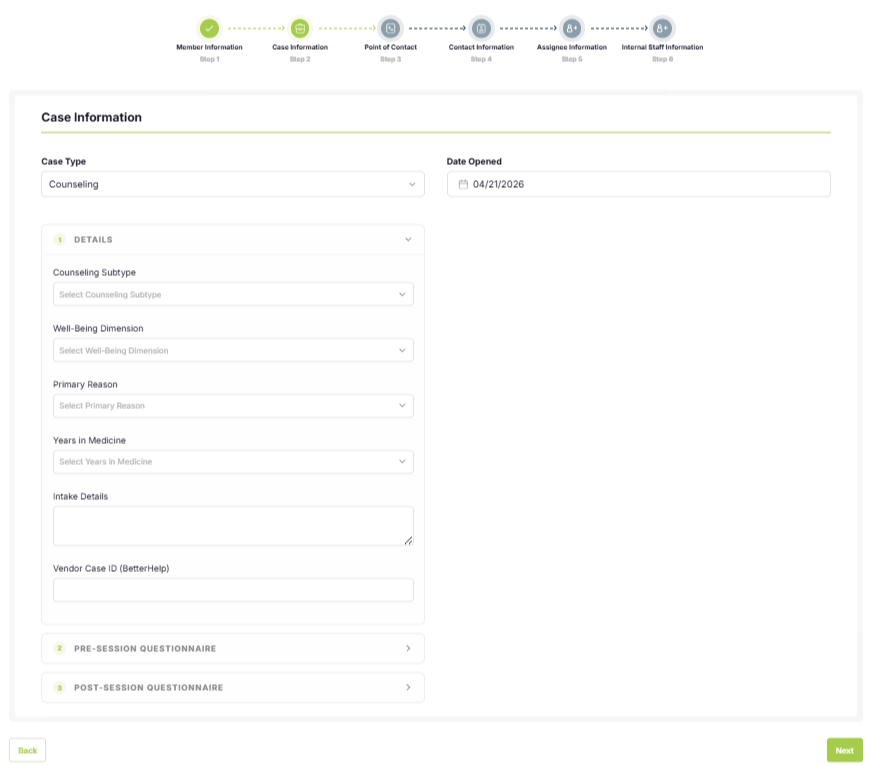
Step 2 Case Information
Date Opened is the primary required field in the entire case creation process.
The detail fields that appear below Case Type change dynamically based on the case type and solution selected. Each case type (Coaching, Consulting, Counseling, etc.) has its own form with different fields.
After completing the populated Case Information detail fields from the selected Case Type, click Next.
Note, not all of the case fields are required, you may proceed with minimal information to get started and complete after case creation.
Step 3 Point of Contact
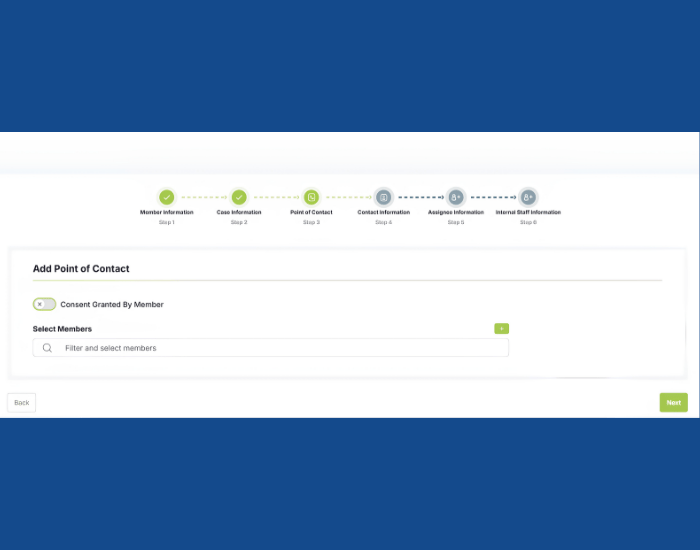
This step is optional. Use it to identify any additional individuals who are authorized to communicate on behalf of the member for this case (e.g., a parent, guardian, HR contact, or family member).
Consent Granted by Member toggle confirms the member has given consent for a third party to communicate on their behalf for the case.
Tip: If the point of contact is not already a member in VITALsync, you can create a new member record directly from this step using the “+” button. The member creation form will open inline.
Step 4 Contact Information
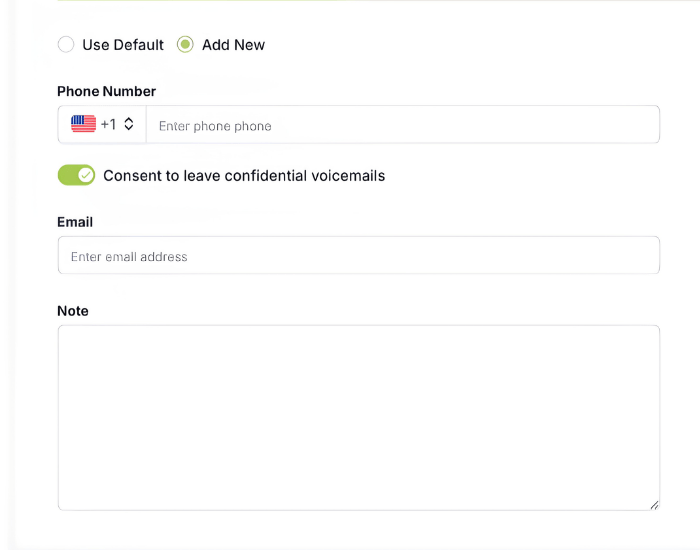
This optional step sets the contact preferences for this specific case.
If there is not a need for adding specific contact information for this specific case, you can use the member’s default contact information from their profile, or add new contact details for this case. If adding new contact information, you will have the option to tie a note to add specific details to help the case, for example, member provides a contact number they prefer during a certain range of hours.
Click Next when ready.
Step 5 Assignee Information
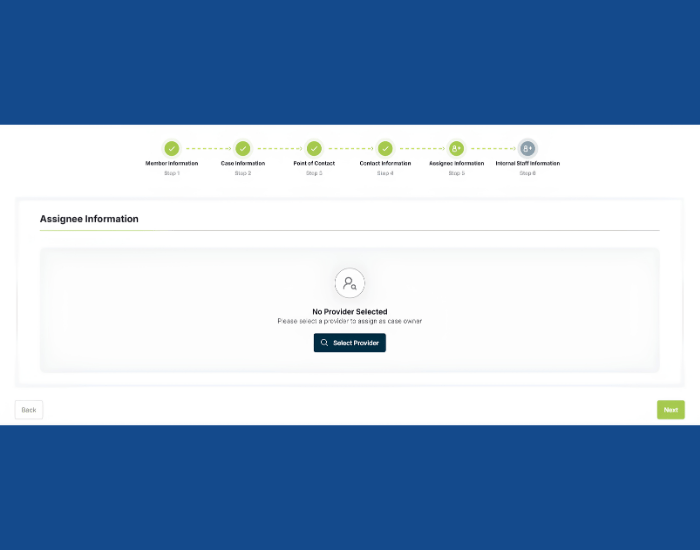
This step is optional. Use it to assign a provider (consultant) as the case owner. If you do not yet know which provider to assign, you can skip this step and assign one later from the case detail view.
Click the Select Provider button to open the provider search pop out. Search by name, address or use filters to find the appropriate consultant. Select the provider to highlight and assign them as the case owner. Click assign, you will be taken back to case creation final step.
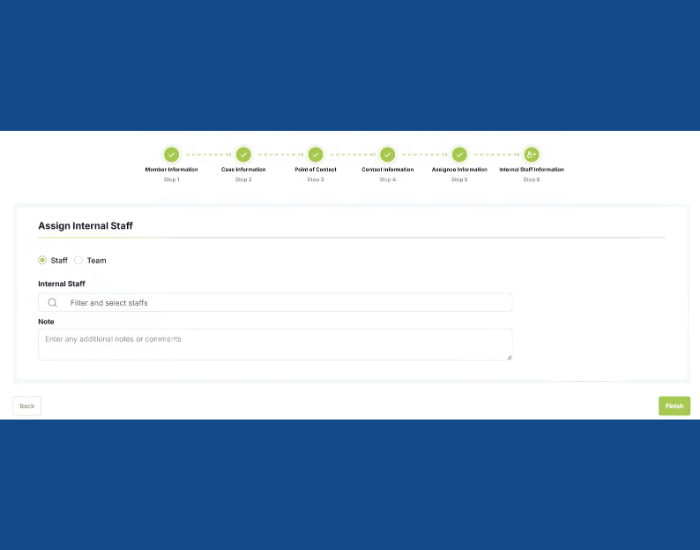
Step 6 Internal Staff Information
This step is optional. Use it to assign internal VITAL WorkLife staff members or teams to the case.
This identifies who is responsible for the case internally. Multiple staff and teams can be assigned and unassigned to a Case.